
Deploy private docker registry in kubernetes
Step 1: Creating files for authentication
Make a folder and open terminal within a folder created
mkdir registry
cd registry
Create tls certificate and a key
openssl req -x509 -newkey rsa:4096 -days 3650 -nodes -sha256 -keyout certs/tls.key -out certs/tls.crt -subj "/CN=<docker-registry.mydomain.com>"Use htpasswd to add user authentication for registry access. If htpasswd is not installed then install using below command.
sudo apt-get install apache2-utilsCreate authentication file using htpasswd
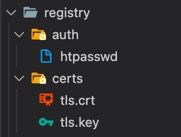
htpasswd -Bbn <your_username> <your_password> > auth/htpasswdAt the end of this you will have folders as follows
Step 2: Create kubernetes secrets
Kubernetes secrets is a way of storing secrets / keys in kubernetes master storage.
Create a secret to store tls certificates
The below command creates a Secret of type tls named certs-secret in the default namespace from the pair of public/private keys we just created.
kubectl create secret tls registry-certs-secret --cert=<path-to-registry-folder>/certs/tls.crt --key=<path-to-registry-folder>/certs/tls.keyThe Secret auth-secret that we create from the htpasswd file is of type generic which means the Secret was created from a local file.
kubectl create secret generic registry-auth-secret --from-file=<path-to-registry-folder>/auth/htpasswdStep 3: Create storage class and persistant volume claim for repository storage
We are using OpenEBS to configure and manage persistant volumes
Create storage class
docker-registry-sc.yaml
apiVersion: storage.k8s.io/v1
kind: StorageClass
metadata:
  name: docker-registery-sc
  annotations:
    openebs.io/cas-type: local
    cas.openebs.io/config: |
      - name: StorageType
        value: hostpath
      - name: BasePath
        value: <path-where-registry-should-be-stored>
   # eg value: /home/techiterian/Documents/volumes/docker_registry
provisioner: openebs.io/local
reclaimPolicy: Retain
volumeBindingMode: WaitForFirstConsumer
Create persistant volume claim
docker-registry-pvc.yaml
kind: PersistentVolumeClaim
apiVersion: v1
metadata:
  name: docker-registry-pvc # Specify name for pvc
spec:
  storageClassName: docker-registery-sc # Make sure storage class name is correctly spelled
  accessModes:
    - ReadWriteOnce
  resources:
    requests:
      storage: 2G # Specify appropriate storage
Execute below commands to create StorageClass and Persistant Volume Claim
kubectl apply -f <path-to-docker-registry-sc.yaml>
kubectl apply -f <path-to-docker-registry-pvc.yaml>
Step 4: Create a deployment for docker registry
docker-registry-deployment.yaml
apiVersion: apps/v1
kind: Deployment
metadata:
  name: docker-registry-deployment
spec:
  selector:
    matchLabels:
      app: docker-registry-deployment
  template:
    metadata:
      labels:
        app: docker-registry-deployment
    spec:
      nodeSelector: # Specify node selector to specify on which node docker registry should be running. Persistant volumes will be created on same node
        kubernetes.io/hostname: prd-master1.rapidoreach.com
      containers:
      - name: docker-registry-deployment
        image: registry:2.7.1
        resources:
          limits:
            memory: "256Mi"
            cpu: "500m"
        ports:
        - containerPort: 5000
        volumeMounts:
          - mountPath: "/var/lib/registry" # /var/lib/registry is a common location within a pod where all registries will be stored
            name: registry-database-volume
          - mountPath: "/certs"
            name: certs-volume
          - mountPath: "/auth"
            name: auth-volume
        env: # Environment variables being set which will be used by registry pod
          - name: REGISTRY_AUTH
            value: "htpasswd"
          - name: REGISTRY_AUTH_HTPASSWD_REALM
            value: "Registry Realm"
          - name: REGISTRY_AUTH_HTPASSWD_PATH
            value: "/auth/htpasswd"
          - name: REGISTRY_HTTP_TLS_CERTIFICATE
            value: "/certs/tls.crt"
          - name: REGISTRY_HTTP_TLS_KEY
            value: "/certs/tls.key"
      volumes:
        - name: registry-database-volume # Persistant volume claim is used here
          persistentVolumeClaim:
            claimName: docker-registry-pvc
        - name: certs-volume # Secret used here to make certificates available wihtin created pod
          secret:
            secretName: registry-certs-secret
        - name: auth-volume # Secret used here to make htpasswd auth available wihtin created pod
          secret:
            secretName: registry-auth-secret
Use below command to create a deployment
kubectl apply -f <path-to-docker-registry-deployment.yaml>Step 5: Create node port service
Node port service will be used to expose created docker registry over internet
docker-registry-node-port.yaml
apiVersion: v1
kind: Service
metadata:
  name: docker-registry-node-port
spec:
  type: NodePort
  ports:
    - port: 5000 # Port which will be used internally by all pods
      targetPort: 5000 # Target port of docker registry pod where registry is listening
      nodePort: 30001 # Public port where docker registry will be available
  selector:
    app: docker-registry-deployment # Make sure selector should match with the label of deployment
Use below command to create a node port service
kubectl apply -f <path-to-docker-registry-node-port.yaml>Step 6: Configure docker to trust self signed tls certificate
We must copy the tls.crt that we created earlier as “ca.crt” into a custom /etc/docker/certs.d/<subdomain-where-registry-is-accessible> directory in all the nodes in our cluster to make sure that our self-signed certificate is trusted by Docker. Note that the directory that is created inside /etc/docker/certs.d should have the name of the format<registry_name>:<registry_port> for <subdomain-where-registry-is-accessible>
sudo mkdir -p /etc/docker/certs.d/<subdomain-where-registry-is-accessible>Copy tls certificate
cp <path-to-registry-folder>/certs/tls.crt /etc/docker/certs.d/<subdomain-where-registry-is-accessible>/ca.crtStep 7: Use secret to store image pull login details