Setting up of Kubernetes Cluster
- Setup master and worker node VM's
- Create service account
- Accessing Kubernetes Dashboard
- Setting up persistant storage using OpenEBS
- Deploy private docker registry in kubernetes
- Installation of Ingress nginx
- Host Docker private registry using Ingress
Setup master and worker node VM's
Setup VPS and install docker (all nodes)
Refer: https://projects-srv2.kondgekar.com/projects/cbofferwall/wiki/0000-preliminary-setup
Fix swap (all nodes)
Installing kubernetes needs swap should be disabled. Check if swap is enabled and then disable if swap is enabled.
Disable swap
sudo swapoff -aRemove / comment out respective swap entry from fstab file
sudo nano /etc/fstab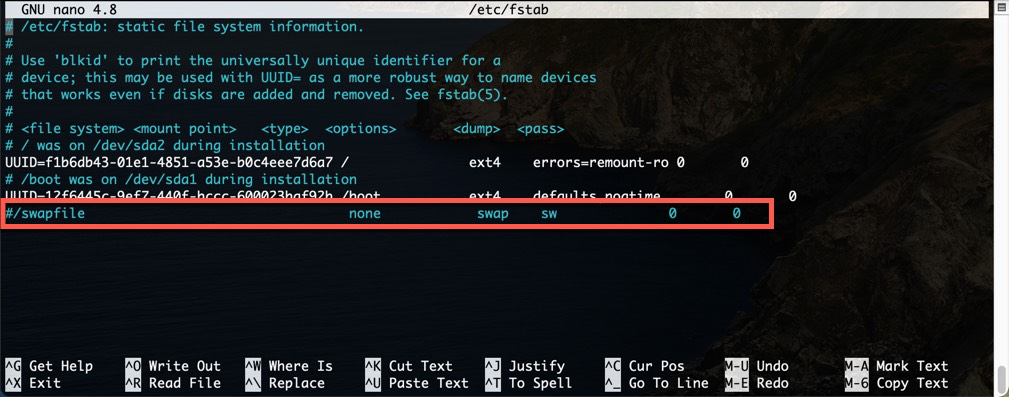
Install kubeadm, Kubelet And Kubectl (all nodes)
Refer: https://kubernetes.io/docs/setup/production-environment/tools/kubeadm/install-kubeadm/
sudo apt-get update
sudo apt-get install -y apt-transport-https ca-certificates curlsudo curl -fsSLo /usr/share/keyrings/kubernetes-archive-keyring.gpg https://packages.cloud.google.com/apt/doc/apt-key.gpgecho "deb [signed-by=/usr/share/keyrings/kubernetes-archive-keyring.gpg] https://apt.kubernetes.io/ kubernetes-xenial main" | sudo tee /etc/apt/sources.list.d/kubernetes.listsudo apt-get update
sudo apt-get install -y kubelet kubeadm kubectl
sudo apt-mark hold kubelet kubeadm kubectlUpdate Kubernetes Configuration (all nodes)
sudo nano /etc/systemd/system/kubelet.service.d/10-kubeadm.confThis will open a text editor, enter the following line after the last “Environment Variable”:
Environment=”cgroup-driver=systemd/cgroup-driver=cgroupfs”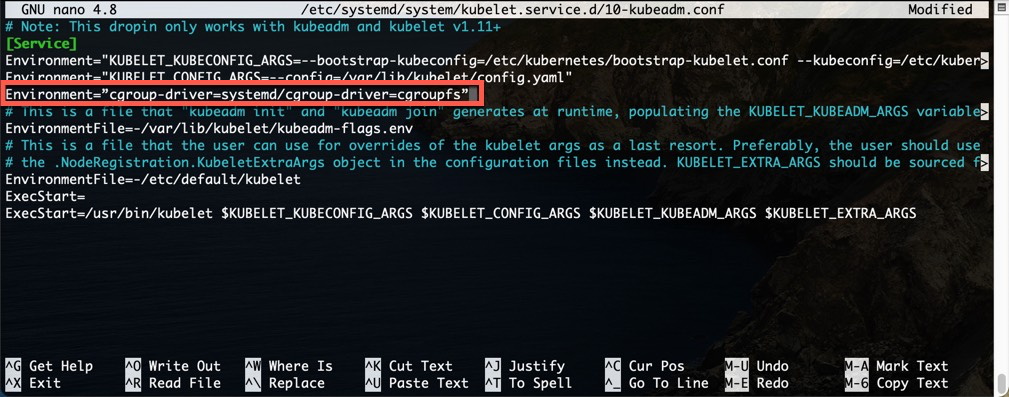
Start kubernetes cluster (on master)
We are going to use Flannel as a networking for pods
sudo kubeadm init --apiserver-advertise-address=<ip-address-of-kmaster-vm> --pod-network-cidr=10.244.0.0/16- You will get the below output. The commands marked as (1), execute them as a non-root user. This will enable you to use kubectl from the CLI
- The command marked as (2) should also be saved for future. This will be used to join nodes to your cluster
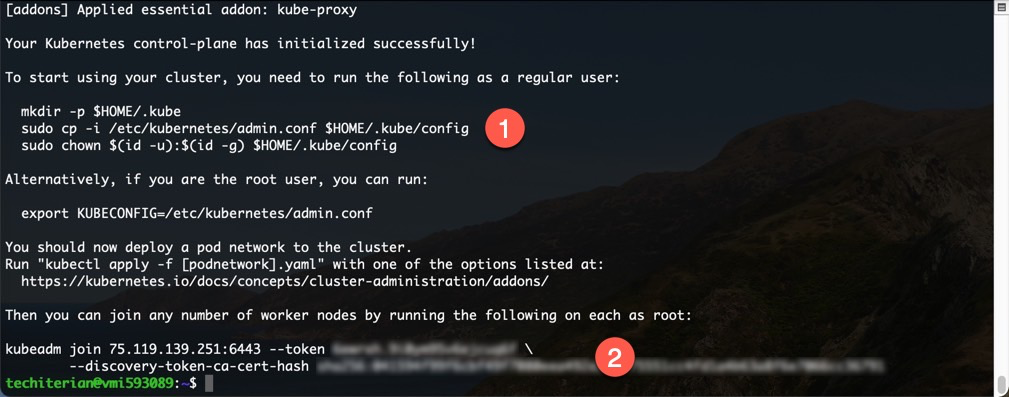
Execute commands as mentioned above.
mkdir -p $HOME/.kube
sudo cp -i /etc/kubernetes/admin.conf $HOME/.kube/config
sudo chown $(id -u):$(id -g) $HOME/.kube/configVerify if cluster is running (on master)
kubectl get pods -o wide --all-namespaces
Notice that all pods are running except coredns. It will be running once we setup pod network in the next step
Install POD network (Flannel) (on master)
kubectl apply -f https://raw.githubusercontent.com/coreos/flannel/master/Documentation/kube-flannel.yml
kubectl get pods -o wide --all-namespaces
Notice that all pods are now running
Install Kubernetes Dashboard (on master)
Refer: https://kubernetes.io/docs/tasks/access-application-cluster/web-ui-dashboard/
Check available nodes (on master)
kubectl get nodes
Notice that only one node is available which is a master node.
Add worker node (on worker node)
Use below command to join Kuberneter cluster from worker node
kubeadm join <master-node-ip-address>:6443 --token <generated-token> \
--discovery-token-ca-cert-hash <generated-hash>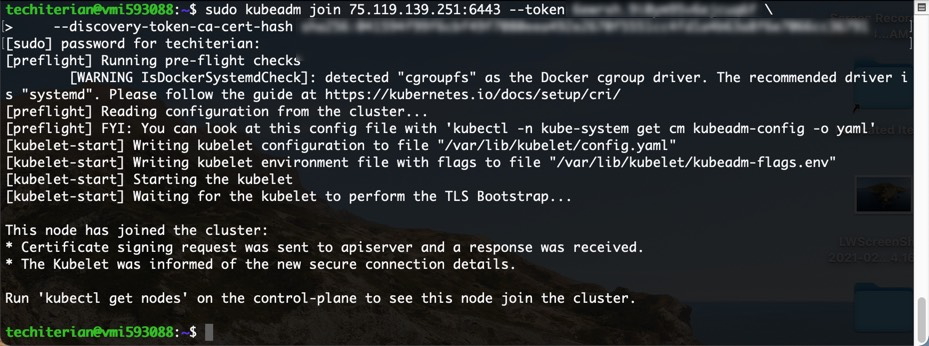
Check if node is added in cluster (on master)
Initially worker node will show status as not ready

Wait for some time and it will be shown as Ready

Kubernetes cluster is now running. You can now run containerized applications and make it available over web using specific setup
Create service account
Ref: https://computingforgeeks.com/create-admin-user-to-access-kubernetes-dashboard/
admin-sa.yml
---
apiVersion: v1
kind: ServiceAccount
metadata:
name: techiterian-cluster-admin
namespace: kube-system
---
apiVersion: rbac.authorization.k8s.io/v1
kind: ClusterRoleBinding
metadata:
name: techiterian-cluster-admin
roleRef:
apiGroup: rbac.authorization.k8s.io
kind: ClusterRole
name: cluster-admin
subjects:
- kind: ServiceAccount
name: techiterian-cluster-admin
namespace: kube-systemRun following command
kubectl apply -f admin-sa.ymlTo obtain admin user token
Set a variable to store the name of the service account.
SA_NAME="techiterian-cluster-admin"To view token
kubectl -n kube-system describe secret $(kubectl -n kube-system get secret | grep ${SA_NAME} | awk '{print $1}')Token obtained from above command can be used to access Kubernetes dashboard
Accessing Kubernetes Dashboard
To install kubernetes dashboard on master node make sure to install it before worker nodes join k8s cluster.
Obtain login token for service account (on master)
SA_NAME="<service-account-name>"
# eg SA_NAME="techiterian-cluster-admin"to print token
kubectl -n kube-system describe secret $(kubectl -n kube-system get secret | grep ${SA_NAME} | awk '{print $1}')Service account along with a token will be printed
techiterian@prd-master1:~/Documents/k8s-rapidoreach-prod$ kubectl -n kube-system describe secret $(kubectl -n kube-system get secret | grep ${SA_NAME} | awk '{print $1}')
Name: techiterian-cluster-admin-token-cvmgg
Namespace: kube-system
Labels: <none>
Annotations: kubernetes.io/service-account.name: techiterian-cluster-admin
kubernetes.io/service-account.uid: e5538ac5-41c1-44aa-9f4e-b06888cc86f0
Type: kubernetes.io/service-account-token
Data
====
namespace: 11 bytes
token: <token here>
ca.crt: 1066 bytesStart proxy to access kubernetes dashboard (on master)
kubectl proxyOpen ssh tunnel (on local machine)
Kubernetes dashboard will currently be accessible only from master node where kubectl proxy is executed. To access it from remote machine use ssh tunnel
ssh -L 8001:localhost:8001 techiterian@prd-master1.rapidoreach.comAbove command will open ssh tunnel which will forward all traffic from localhost port 8001 to kubernetes proxy port 8001
Access Kubernetes dashboard using url
Kubernetes dashboard is not accessible from local machine
Setting up persistant storage using OpenEBS
Install iSCSI on all nodes
Refer: https://docs.openebs.io/docs/next/prerequisites.html
Install iSCSI tools if not installed
sudo apt-get update
sudo apt-get install open-iscsi
sudo systemctl enable --now iscsidCheck if iSCSI is running
sudo systemctl status iscsid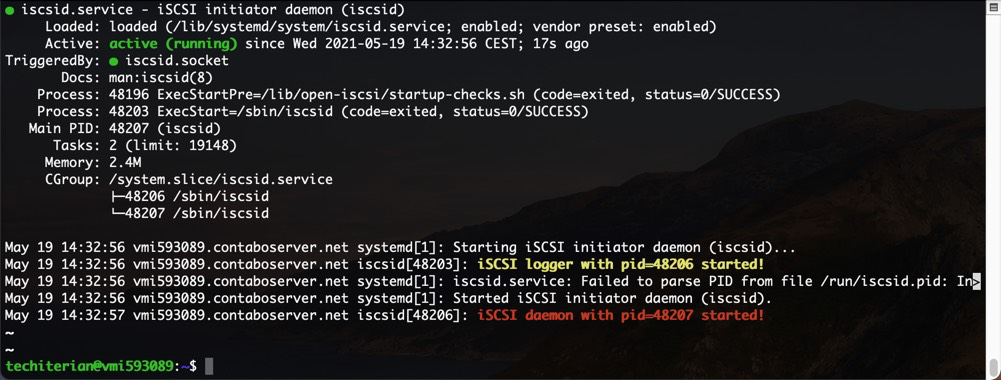
Make sure you have admin context
kubectl config use-context kubernetes-admin@kubernetesRemove taint from master node
We need to use master node as a storage node where all database files and persistant volumes will be stored. Remove taint from master node so that master node will be available to schedule pods
kubectl taint node <masternode_name> node-role.kubernetes.io/master:NoSchedule-Install using kubectl
Download file https://openebs.github.io/charts/openebs-operator.yaml
to install OpenEBS to use volumes from master node we need to label master node with appropriate label
Use following command to label master node
kubectl label nodes <node-name> node=openebsNext, in the downloaded openebs-operator.yaml, find the PodSpec for openebs-provisioner, maya-apiserver, openebs-snapshot-operator, openebs-admission-server and openebs-ndm pods and add the following key-value pair under nodeSelector field
nodeSelector field will be available in pod > specs > template > specs > nodeSelector
nodeSelector:
node: openebsInstall OpenEBS with updated command
kubectl apply -f openebs-operator.ymlCheck if OpenEBS has been installed
kubectl get pods -n openebs -o wideOutput should show running pods

Deploy private docker registry in kubernetes
Step 1: Creating files for authentication
Make a folder and open terminal within a folder created
mkdir registry
cd registryCreate tls certificate and a key
openssl req -x509 -newkey rsa:4096 -days 3650 -nodes -sha256 -keyout certs/tls.key -out certs/tls.crt -subj "/CN=<docker-registry.mydomain.com>"Use htpasswd to add user authentication for registry access. If htpasswd is not installed then install using below command.
sudo apt-get install apache2-utilsCreate authentication file using htpasswd
htpasswd -Bbn <your_username> <your_password> > auth/htpasswdAt the end of this you will have folders as follows
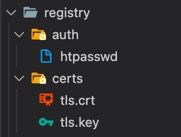
Step 2: Create kubernetes secrets
Kubernetes secrets is a way of storing secrets / keys in kubernetes master storage.
Create a secret to store tls certificates
The below command creates a Secret of type tls named certs-secret in the default namespace from the pair of public/private keys we just created.
kubectl create secret tls registry-certs-secret --cert=<path-to-registry-folder>/certs/tls.crt --key=<path-to-registry-folder>/certs/tls.keyThe Secret auth-secret that we create from the htpasswd file is of type generic which means the Secret was created from a local file.
kubectl create secret generic registry-auth-secret --from-file=<path-to-registry-folder>/auth/htpasswdStep 3: Create storage class and persistant volume claim for repository storage
We are using OpenEBS to configure and manage persistant volumes
Create storage class
docker-registry-sc.yaml
apiVersion: storage.k8s.io/v1
kind: StorageClass
metadata:
name: docker-registery-sc
annotations:
openebs.io/cas-type: local
cas.openebs.io/config: |
- name: StorageType
value: hostpath
- name: BasePath
value: <path-where-registry-should-be-stored>
# eg value: /home/techiterian/Documents/volumes/docker_registry
provisioner: openebs.io/local
reclaimPolicy: Retain
volumeBindingMode: WaitForFirstConsumerCreate persistant volume claim
docker-registry-pvc.yaml
kind: PersistentVolumeClaim
apiVersion: v1
metadata:
name: docker-registry-pvc # Specify name for pvc
spec:
storageClassName: docker-registery-sc # Make sure storage class name is correctly spelled
accessModes:
- ReadWriteOnce
resources:
requests:
storage: 2G # Specify appropriate storage
Execute below commands to create StorageClass and Persistant Volume Claim
kubectl apply -f <path-to-docker-registry-sc.yaml>
kubectl apply -f <path-to-docker-registry-pvc.yaml>Step 4: Create a deployment for docker registry
docker-registry-deployment.yaml
apiVersion: apps/v1
kind: Deployment
metadata:
name: docker-registry-deployment
spec:
selector:
matchLabels:
app: docker-registry-deployment
template:
metadata:
labels:
app: docker-registry-deployment
spec:
nodeSelector: # Specify node selector to specify on which node docker registry should be running. Persistant volumes will be created on same node
kubernetes.io/hostname: prd-master1.rapidoreach.com
containers:
- name: docker-registry-deployment
image: registry:2.7.1
resources:
limits:
memory: "256Mi"
cpu: "500m"
ports:
- containerPort: 5000
volumeMounts:
- mountPath: "/var/lib/registry" # /var/lib/registry is a common location within a pod where all registries will be stored
name: registry-database-volume
- mountPath: "/certs"
name: certs-volume
- mountPath: "/auth"
name: auth-volume
env: # Environment variables being set which will be used by registry pod
- name: REGISTRY_AUTH
value: "htpasswd"
- name: REGISTRY_AUTH_HTPASSWD_REALM
value: "Registry Realm"
- name: REGISTRY_AUTH_HTPASSWD_PATH
value: "/auth/htpasswd"
- name: REGISTRY_HTTP_TLS_CERTIFICATE
value: "/certs/tls.crt"
- name: REGISTRY_HTTP_TLS_KEY
value: "/certs/tls.key"
volumes:
- name: registry-database-volume # Persistant volume claim is used here
persistentVolumeClaim:
claimName: docker-registry-pvc
- name: certs-volume # Secret used here to make certificates available wihtin created pod
secret:
secretName: registry-certs-secret
- name: auth-volume # Secret used here to make htpasswd auth available wihtin created pod
secret:
secretName: registry-auth-secretUse below command to create a deployment
kubectl apply -f <path-to-docker-registry-deployment.yaml>Step 5: Create node port service
Node port service will be used to expose created docker registry over internet
docker-registry-node-port.yaml
apiVersion: v1
kind: Service
metadata:
name: docker-registry-node-port
spec:
type: NodePort
ports:
- port: 5000 # Port which will be used internally by all pods
targetPort: 5000 # Target port of docker registry pod where registry is listening
nodePort: 30001 # Public port where docker registry will be available
selector:
app: docker-registry-deployment # Make sure selector should match with the label of deploymentUse below command to create a node port service
kubectl apply -f <path-to-docker-registry-node-port.yaml>Step 6: Configure docker to trust self signed tls certificate
We must copy the tls.crt that we created earlier as “ca.crt” into a custom /etc/docker/certs.d/<subdomain-where-registry-is-accessible> directory in all the nodes in our cluster to make sure that our self-signed certificate is trusted by Docker. Note that the directory that is created inside /etc/docker/certs.d should have the name of the format<registry_name>:<registry_port> for <subdomain-where-registry-is-accessible>
sudo mkdir -p /etc/docker/certs.d/<subdomain-where-registry-is-accessible>Copy tls certificate
cp <path-to-registry-folder>/certs/tls.crt /etc/docker/certs.d/<subdomain-where-registry-is-accessible>/ca.crtStep 7: Testing of private docker registry
Lets try to connect with private docker registry. Perfereably use master node
docker login <docker-registry-fully-qualified-domain-name>:<port> -u myuser -p mypasswdIt will output

If Login is not successfull then make sure you follow step 6 and copied tls.crt as ca.crt in appripriate folder of whichever machine you are running above command.
Additionally check if username and password is correctly put same as that of Step 1
Step 8: Use secret to store image pull login details
To authorize a pod to pull image from private registry we need to provide image pull credentials to pod. Lets create a secret whcih will store these credentials
kubectl create secret docker-registry regcred --docker-server=<your-registry-server> --docker-username=<your-name> --docker-password=<your-password>Step 9: Test if custom image can be pushed to out private docker registry
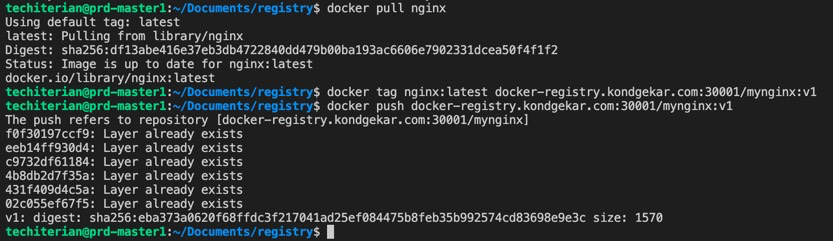
# Pull standard image available on docker hub
docker pull nginx
# Tag the image for private registry
docker tag nginx:latest <your-registry-server>/mynginx:v1
# Push docker image to private repository
docker push <your-registry-server>/mynginx:v1Command output will look like
Step 10: Deploy a pod and use private registry to pull image from
Refer: https://kubernetes.io/docs/tasks/configure-pod-container/pull-image-private-registry/
Installation of Ingress nginx
Refer: https://github.com/kubernetes/ingress-nginx
Install using baremetal
Refer: https://kubernetes.github.io/ingress-nginx/deploy/#bare-metal
Download script to specific folder
cd <folder-path>
wget https://raw.githubusercontent.com/kubernetes/ingress-nginx/controller-v0.46.0/deploy/static/provider/baremetal/deploy.yamlRename download .yaml file
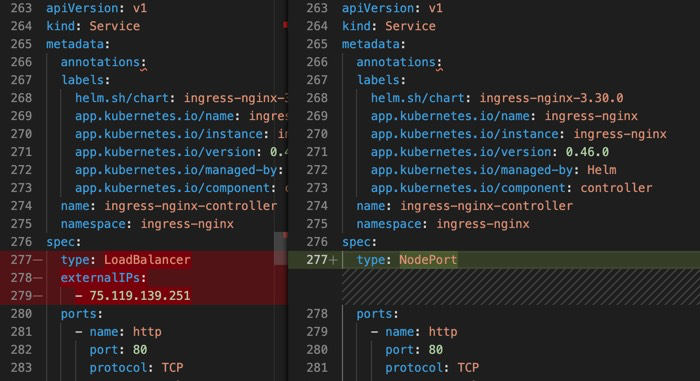
mv ./deploy.yaml ingress-nginx-controller.yamlin order to use ingress and assign an external ip address we ned to use Load Balancer instead of NodePort of ingress nginx controller. Update ingress-nginx-controller.yaml with following lines
spec:
type: LoadBalancer
externalIPs:
- <valid-external-ip>
Install ingress controller using following command
kubectl apply -f ingress-nginx-controller.yamlAbove command will create following pods and services
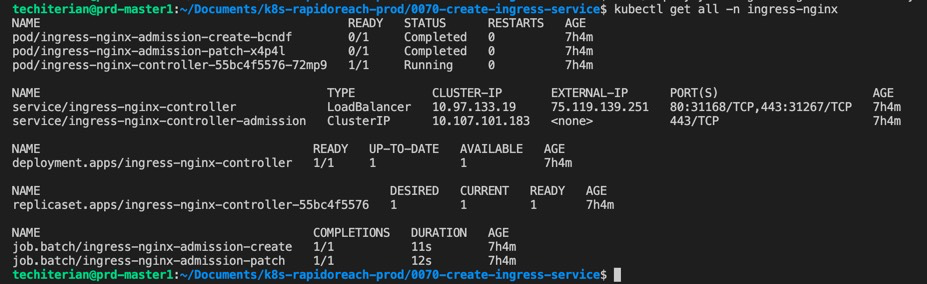
ingress nginx controller is now installed. We can now create ingress object to correctly route traffix to NodePort or ClusterIP services
Host Docker private registry using Ingress
Make sure ingress nginx is installed and following command shows external Ip assigned
kubectl get services -o wide -n ingress-nginx
if external ip is not assigned then nginx controller needs modifications. Refer: Ingress installation
Create ingress
prd-ingress-service.yaml
apiVersion: networking.k8s.io/v1
kind: Ingress
metadata:
name: prd-ingress-service
annotations:
# use the shared ingress-nginx
kubernetes.io/ingress.class: "nginx"
labels:
name: prd-ingress-service
spec:
tls:
- hosts:
- <your-subdomain-domain>
secretName: <tls-certificate secret>
rules:
- host: <your-subdomain-domain>
http:
paths:
- pathType: Prefix
path: "/"
backend:
service:
name: <service-name>
port:
number: <service-local-port>
Docker private registry will now be available over internet